
About In Vitro Plantlets
Introduction
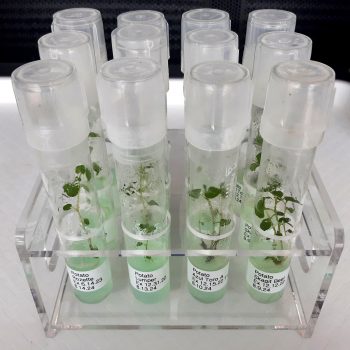
In vitro means “in glass” and so, in the strictest terms, an in vitro plantlet is just a small plant in a container. There are some additional things that are usually implied by the term, including that the container is sealed, sterile environment, preventing exchange of anything but gases with the outside, and that the growing medium is synthetic, usually made from agar or similar gels. A plantlet grows in its own miniature greenhouse, kept safe from all of the dangers of the exterior world, like pests, pathogens, and changes in conditions. This is an excellent way to maintain disease free plants in a space-efficient manner.
For plants that grow true from seeds, there is usually little reason to culture in vitro, because seeds generally provide a disease free start. Unfortunately, plants that are cloned, like most tuber crops, rarely grow true from seed and are instead propagated by vegetative parts of the plant. From the standpoint of managing disease, tubers are about the worst propagation material you could imagine. The same plant goes on living from year to year, accumulating viral, bacteria, and fungal diseases over time. In addition, tubers have contact with the soil, which means that they can transmit soil-borne pests and diseases even if the plant itself is not infected. For the most common tuber-propagated crop, the potato, we have extensive, complicated, and expensive systems that inspect and certify the tubers that are used for propagation, but the reality is that even these systems are imperfect and allow though a considerable amount of disease. Managing a large collection of varieties that are grown in natural conditions quickly becomes a challenge and, eventually, an impossibility.
I have reached the stage where managing disease in my field crop, at least to the extent that I feel is appropriate when selling tubers for propagation, is an impossibility. I continue to grow and breed plants at the same scale as ever and you would probably not notice much that would alarm you if you came and looked things over, but I have to ask the question: what percentage of my customers is acceptable to infect with one or more diseases that might prove to be serious or even permanent in their environments? With tubers grown in soil, that number can never be zero. When growing plants in vitro, it is probably still not zero, because there is always the unknown unknown, but it is as close to zero as I can possibly achieve. And, so, I have settled on in vitro plantlets as the only form in which I offer clonal varieties.
Since I introduced plantlets and then later raised the price, by far the most common questions that I receive relate to the price. Yes, my in vitro plantlets are expensive. I don’t intend for them to be a product for everyone. In most cases, I also offer genetically diverse seeds that are much less expensive to produce. In vitro plantlets are for people who are determined to grow the original clone. They are expensive because I have typically spent a small fortune getting them established and treated to be free of disease. They are also expensive because my capacity is small. One lesson that I have had to learn over and over again is that it is better to work less for more than more for less. While the start is expensive, you should be able to continue growing the variety for many years from your own tubers.
Availability & Shipping
As is true with most of the work that I do, I am selling the excess that results from my breeding work more than I am setting out to produce a lot of product to sell. My lab is small and I maintain several hundred varieties. I propagate those cultures two or three times a year and it takes usually somewhere between one and three months for a new culture to reach a size suitable for sale. With the exception of a few varieties that sustain really high interest, I almost never make more than five extra batches of plantlets at a time. If I propagate three times a year, that means I might produce 15 order’s worth for any given variety. I do this work year round, not just during the growing season, so it is unlikely that a variety you want will be available just when you want it. If you want to purchase plantlets, the best way is to sign up for the waitlist. You will then be notified when I put some in stock. I do pay some attention to the size of the waitlists and try to produce some more if they grow long.
When plantlets are in stock, they are available to ship immediately (which usually means within two weeks). This is true even in the dead of winter. If it seems necessary, I will ship with a heat pack, but my experience has been that packages sent by priority and overnight shipping rarely get frozen. It is always a risk though and, if you should receive a box of dead plants, I will, of course, refund your order. Just send me a picture of the damage.
The normal cost for 3 in vitro plantlets is $75 shipped. Shipping is normally done by USPS Priority Mail and sent on Mondays, unless Monday is a holiday that week. Because there is a default discount of 10% for orders over $75, the price is effectively $67.50 if you order two or more.
In Vitro Plantlet Instructions
Please read these instructions before opening your plantlets. Removing your plantlets from the tubes and preparing them to be transplanted outdoors is not a difficult procedure, but it is also not a forgiving one. Your plantlets have lived their entire lives in an ideal environment. They have experienced 100% humidity, abundant nutrients, and no environmental stress, pests, or diseases. Removing them from that ideal environment is a shock and the goal is to minimize that shock.
You don’t need to be in a hurry. In fact, I recommend waiting at least three days before you remove them. They have been in total darkness in the shipping box for a few days and it will help them to get some light. There is a sufficient level of nutrients in each tube for the plantlet to survive at least another month and much longer in many cases. Even if the plantlet grows up against the top of the tube, that is not a problem. Keep your plantlets in the light, preferably some indirect sunlight, but normal indoor light is usually fine. Do not place them in direct sun, like on a window sill, because you risk cooking them in the tubes. Do not remove the wrapping on the tube until you are ready to transplant. The wrapping is not plastic, but a paraffin wax product that allows for gas exchange while keeping out insects and most microorganisms.
Your plantlets will be sent in 25mm glass test tubes. Test tubes will contain one plantlet each. Please inspect each tube carefully for cracks. Sometimes they are damaged in shipping and it can be dangerous to handle a cracked glass tube. For each plantlet, you will need one small pot, fresh potting soil, and a plastic bag large enough to fit over the pot. You should also have a grow light or a location with good natural light where you will grow your potted plantlets for four to six weeks.
I recommend that you do not transplant all three plantlets at once, particularly if you don’t have experience. I would divide them up over several days. I send three plantlets in the hope that you will get one of them to maturity. As long as you can get one plant to grow and give you more material to propagate, that’s a success.
When you are ready, fill a pot with potting soil, tamp it down a little, and then give it an hour to soak up as much water as it can. Put the pot on a surface where it can drain freely, like a nursery tray. Now, take the tube that you intend to plant and push it into the soil so that the level of the agar in the tube is about 1/2 inch below the level of the soil. Remove the tube and you now have a planting hole. In the box with your plantlets, you should have found a disposable spatula. The wide end of the spatula will allow you to remove the plantlet, hopefully with its agar substrate intact. Remove the wrap from the tube and remove the cap. Work the spatula around the inside of the tube and then use it to scoop out the plantlet. You should then be able to slide the plantlet along with its agar blob right into the hole that you made. The plantlet should be a little bit deeper than it was in the tube. Fill in the hole. You want the agar to be covered by about 1/2 inch of soil. Now, take your plastic bag and cover the pot. The saturated soil and the plastic bag provide the 100% humidity environment that the plantlet is accustomed to. Keep the plantlet under lights or in natural light for at least 12 hours per day, but preferably 16 hours. Be careful about the temperature. Any time a plant is sealed in plastic under lights, you run the risk of overheating it.
We now begin the process of hardening off the plantlet. Leave it alone for two days. On the third day, poke two holes about 1/4″ inch diameter in the bag. A pencil or pen will do a fine job. Add two more holes each day until there are ten holes in the bag. (That makes a full week.) The next day, remove the bag. Observe the plantlet for signs of distress. Most of the time it will be fine, but, if it wilts, put the bag back on for a couple of days and try again. Don’t water the pots until the soil is pretty dry and always water from the bottom. Continue to grow the plant indoors until it has bulked out and is 3-4 inches tall. At that point, it is ready to be acclimated to the outdoors and transplanted to its final location, as you would for any seedling, but I recommend that you continue to grow in a larger pot under a net for the first year to better insure your investment. I have observed over many years that pests are most likely to attack plants that you can’t replace.
Common Problems
The plantlets arrived dead.
Unfortunately, this can happen if the box gets frozen or overheated in transit. Contact me for a refund or replacement. (It will usually be a refund because the batches are small.)
Either the agar or the plantlet came loose and moved in the tube.
This is usually not a big deal. If you have a dislodged plantlet, make that the one that you start with. If it got jammed up and the stem bent or broke, it will usually still survive. Just transplant it as best you can and give it some extra time under the plastic bag if it grows slowly. If the plantlet broke off from the agar, transplant it alone. Even if it lost its roots, it will usually be OK. Just bury it about halfway up the stem and treat it like any other plantlet.
Fungi or bacteria are growing on the agar.
When shipped, plantlets are subjected to changes in air pressure that can force bacteria or fungi into the tubes. You might notice it beginning to grow after you receive the tubes. This is rarely a problem since you will be transplanting the plantlets soon anyway. Start with any that are contaminated. Once you remove the plantlets from the tubes, the contaminating organisms will no longer have an ideal environment and will quickly die.
I accidentally chopped the agar into pieces with the spatula.
It happens. It is easier when you can extract one clean piece, but sometimes it just doesn’t want to cooperate. Scoop what you can into the planting hole. All that really matters is that you get the plantlet in there.
There are dead, yellow, or pale leaves on the plantlet.
Shipping is a stressful process for the plantlets and sometimes they lose a few leaves. It is very common for the plantlets to become pale or yellow in the shipping box. As long as the stem is green and there is green growth at the top, it is nothing to worry about. Go ahead and transplant them and you should see growth resume very quickly.
I followed the instructions and my plantlet still died.
That happens sometimes, even to me. That’s why I send three. The objective is to get at least one of them to maturity so that you can grow your own crop from tubers. If you followed the instructions and none of the plantlets survived, get in touch and we’ll talk about it.